Saturday, March 30, 2013

Getting Crafty with Burlap Flowers

Karli and I are going to decorate/host a tea table for a function her church is having. We brainstormed how we wanted our table to look (color, texture, theme, etc.) and we loved the idea of using burlap and getting crafty. It seems only fitting that our Spring Tea Table should include flowers. 

So, we bought several yards of the natural color burlap and then I checked out different blogs and sites for flower making advice. I found some wonderful ideas and instructions, but after trying several methods, I ended up doing my own thing! 

Let's get started making "Kandy's Burlap Flowers":
Here is what you will need:  burlap, scissors, sewing machine, glue gun, cardboard circles (cut 2" diameter for small or 2 3/4" diameter for large), an old magazine (for gluing on top of...tear off page when gets messy), the lid of a spray paint can (works well to glue on, turns easily), clothespin (and anything else you see in the photos that I failed to mention). 

Here are the steps:
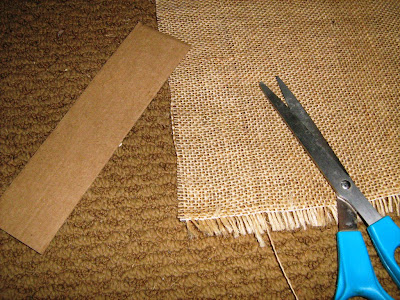
1. Cut fabric into strips 2" wide 44" long (the width of the fabric). 
Tip:   Pull a thread just beyond 2", then cut along this line. This helps your fabric stay square and straight.
          

2. Cut this strip in half (22") for a small flower or leave the full 44" length for a large flower.

3. Fold the strip in half lengthwise and sew along the two edges.
              

4. Fold one end over and use the glue gun to glue it in place. 
Tip:  Use a clothespin to hold it in place while it dries. This end will become the center of your flower

 
5. Pull one thread (from the other end) and start gathering or ruffling up the fabric. 
Tip:  Pick a thread above your line of stitching. Don't pull it completely out. Your clothespin and glued end should hold it.
 

6. While keeping tension on that thread and keeping your fabric ruffled up, fold the remaining end under and glue it. 
Tip:  This is going to become the bottom of your flower.


7. Now glue that edge onto the outside edge of your cardboard circle. Your cardboard circle should be sitting on your spray paint can lid. You can take the clothespin off of the other end. It should be secure by now.


8. Continue gluing that ruffle onto the circle, turning as you go, working your way inside your flower. (Be careful not to burn yourself.) You can cut off the end of the thread that you gathered with. You may also need to trim some threads as you work...burlap frays out easily.
 

9. Continue gluing, forming the center of the flower with the very end of the fabric. This should look somewhat like a flower by now.


10. Carefully hold the very center for a while till the glue has all set up.


If all went well, you should have a flower that looks like this or similar!


If this hasn't been enough steps for you, we can keep going.....

You can cut a circle of burlap, the same size as your cardboard and cover the underneath side of your flower (just so it looks nice on the bottom).

You can also glue on a magnet or whatever else your little heart desires (like a clothespin or brooch pin or hairclip), depending on what you plan to do with "your" flower.

Karli and I are using our flowers on napkin rings and for table decor. We'll be sure to take pictures and make a post about our tea table.  I bet you can hardly wait to see it!!!

Later, Kandy  

Thursday, March 28, 2013

Flea Market Favorites: Top 7 Best Finds

Spring and summer are just around the corner and to me that means garage sales, flea markets (here's one of our favorites) and farm auctions. I get excited just thinking about the bargains and make-over projects I can find. I love the thrill of the hunt.

I have several collections that I'm always willing to add to. Here's the list of what I'm always looking for.


Old Doorknobs and Door Hardware
Great for display as well as projects (like doors)

Vintage Suitcases 
These are all over my house. See my earlier post for some of my favorite ways to use them.

Old Frames     
You can see more of these put to use here.

Framed Relatives 
They don't have to be "your" relatives, just love the look.

Old windows, doors, and shutters
So many uses, you can't have too many of these around. See how we used an old door at Karli's house here and here.

Vintage Ironstone, Platters and Pitchers


I'll never quit adding to my collections.

Furniture Projects
A rocker awaiting its transformation. See more of my favorite chairs here.

A sweet little table just waiting...
See more of my past furniture finds here, here and here (this last one is all about color!).                         

I don't know about you, but just talking about this makes me anxious. I can hardly wait to get out there!  

Happy Hunting!
~Kandy 

Wednesday, March 27, 2013

A Bathroom Makeover: New Curtains

The curtains in my bathroom have always been an issue. You can see by my photos that I have the tub area and the window all fighting for space. This part of my bathroom is quite small consisting of the tub, window, toilet (which you can't see), and even a doorway.

You can see some of the "issues" in these photos.

The window encroaches on the tub area

The tub area

I love tubs draped all the way to the ceiling and on both sides, but adequate lighting in my tub area becomes a problem. At one time I had black and white toile curtains here but that made the area seem even smaller and was a little busy with the granite on the vanity.

You can see the vanity and the black and white toile curtains, which I moved to the guest bedroom in this post. You can also see in this post that my granite has a lot "going on" with it's pattern.  
My solution for this area was to simplify, adding more white and creating a crisper, cleaner feeling. I found white patterned panels at Target. I got two, 84" in length, on sale for $17.99 each.
A close up of the fabric

I used one panel for the tub area, with a white shower liner behind it and only had to shorten the hem a little. I cut the other panel to create the valance for the window.  Since it was a little sheer, I lined up the fabric pattern, and folded the fabric in half to create my valance. This made both areas look similar.

In the tub area I used the shower tension rod, which I already had. I decided in order to get both window and tub rods to match, I had to simply use another tension rod. The only problem was when I found another one like mine at WalMart, the color didn't match. Not a big deal. A friend of mine had given me several packages of metal clips rings and curtain brackets that she didn't need. They were a copper bronze color that didn't match. Still not a big deal. Hubby hammered the metal brackets into the correct size, (1"). And then I just spray painted everything to match! 

I clipped all the curtain rings on to a hanger for easier spraying. I used Rust-oleum Hammered Black Spray Paint for everything.

This was an easy way to spray paint the rings
After all the paint was dry, it was a matter of hanging the "shower tension rod" turned "curtain rod" at the same height as the real "shower tension rod." Everything matches and looks pretty darn good.

The painted rod and clip rings

The two areas now look great! Like they belong together

I decided to add this vintage Victorian Frame above the tub area. I've had it for years just waiting for the perfect spot.
 
The old frame adds a fun touch of whimsy
   
And Voila!.......Bathroom Curtain project completed!

I love what adding more white to the room has done

The curtains go so well with the fluffy white towels
I'll do another post at a later date and describe how we made the bathroom vanity from an old buffet.......

The vanity area (a repurposed buffet) was updated a little bit in this makeover too. I moved the candles to complete my "simplify" plan.
Until then,
~Kandy

Sunday, March 24, 2013

Karli's Kitchen Makeover: Part Three

This post will round out the series about how we made over our 1980's dark, dated kitchen. (Read Part One and Part Two)

We did this all on a budget, but I still think it looks really great. We didn't move any walls or change the location of any appliances. Basically we left the footprint the same, but updated everything.

Part Two left off with the new countertops and subway tile backsplash installed. This post shows all the finishing touches that make me really fall in love with the space.


The space is so bright and clean looking now. The runner is from Ballard. It's indoor/outdoor, which is perfect for a kitchen space. We can wipe up spills with water or take it outside to hose off if it were to get that dirty.


That light from Ballard is genius. There was a pot light there. This new light has a pot light adapter for installation that took me 2 minutes. The shades come in different colors. Mom sewed that little valance for me from an extra curatin I bought from Z Gallerie to match the sliding door. 
 

The green accents in the kitchen really play off the green walls in the adjacent dining room.


We swapped out the fridge the previous owner had just purchased. Lowe's basically took that fridge back and gave us full credit, which we applied to this counter-depth side by side. I felt it was important that the fridge not stick out into the space (which was already a bit narrow).


We moved the table off to the side for easy access to the back door.


All the little touches are what make me so happy. This pear lived in my grandmother's kitchen and was filled with sugar. I never met her, but I think I got some of her cooking/baking genes.


The pulls on the drawers took a lot of mental effort (long story). So happy with how they turned out.


I like having something "alive" in most of our rooms. This little "money tree" plant came from IKEA. The cool glass milk bottle came from TJ Maxx Home Goods.


I think I mentioned this in the last post, but we had the wood taken out of these upper cabinet doors and I picked a seeded glass insert. We keep all our white dishes, servings bowls and special "good luck" mason jar (used at our wedding) in here.  


A view of the entire room as we live with it daily. What a happy space!
 

And because you know I love side by side comparisions, here you go.

This room took priority when we first moved in. I spend so much time in the kitchen between cooking dinner nearly every night (yes I really do that) and making special treats. We also love to entertain and people ALWAYS congregate in the kitchen. I wanted the space to reflect us: inviting, comforting, bright, cheerful. I think it accomplishes that. So we consider it finished...for now. 

~Karli  

Saturday, March 23, 2013

Spring Fever: Flowers on the Brain

Last night I dreamt about flowers. Beautiful hot pink geraniums, tall black eyed susans, showy ice plants, colorful columbines and hummingbirds. I think it's a sign...I've got serious spring fever. Figures. Today it has snowed about a foot.

Our backyard is amazing. We had no idea when we bought it in the middle of winter that it would be so marvelous come spring time.

Sadly we had to cut down that large cottonwood tree, but just look how beautiful this is!
I told you earlier this week about how we're tearing out overgrown trees and bushes up against the house so we can paint the exterior. I mentioned that I'm going to transplant some day lilies from Mom's house in the back where we're losing two large bushes. I think between those and what you can see going on in that picture above, the backyard will be colorful and alive. But the front...


Sorry for the fuzzy picture. It's from the MLS listing. I never took pictures with my camera because I'm embarrassed of it.
We don't have a lot of space in the front. So I feel like a little bit of work and some colorful flowers will go a long way. But there's a lot of work to do (including exterior paint) before I can start planting flowers.

There's a cottonwood stump in the middle of that brick circle thing. (I wish the previous owners would have had the stump ground when they cut it down--now we get to deal with it.) So we're planning to do that (getting rid of the brick circle and the wood chips too) plus removing all the juniper bushes and the three deciduous berry colored bushes.

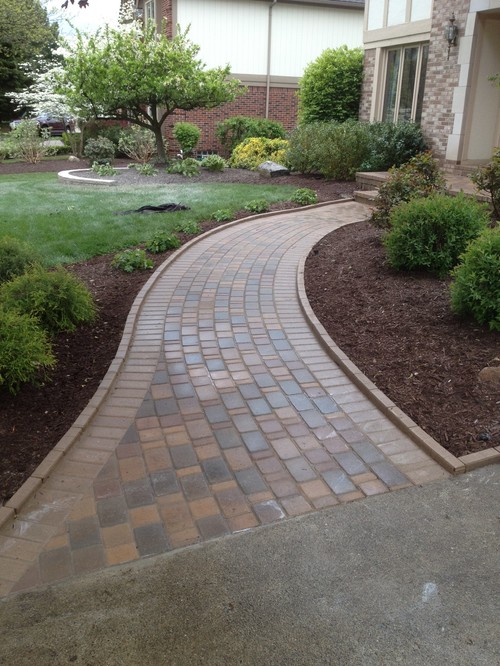
We'll basically have a blank slate at that point, minus the sidewalk from the drive to the porch, which I think will have to go too. We want to "widen" the driveway where you currently see the juniper bush row. We'll do a nice paver row and the extend that up to the front door.

Love the look of this walkway. I think we could use it to extend the driveway about a foot on each side too. From Houzz.com

We'll probably just place new sod over the place where the tree stump is. Then I can start thinking about flowers.

The front of the house faces southwest and it takes a beating in the afternoon sun. PLUS we're going to be in drought restrictions again. So I need to be smart about what goes in the newly found space. After consulting Better Homes and Gardens website and magazine as well as absorbing all I can from a friend's gardening book collection, I have some pretty good ideas.

Here's the basic layout I'm going to follow with these plants. Gotta love Better Homes and Gardens! Their free garden plans provide the names of the plants, how many you need, where to plant them, etc. Sort of foolproof. (Heaven knows I could use THAT...I really know NOTHING about flower gardening) 

Low-Care Sidewalk Garden
"Low Care Sidewalk Garden" from BHG.com. (Sounds perfect!)
I can't wait to get started on the exterior. Finally our neighbors will start to see that we really do care about our house.

~Karli

Wednesday, March 20, 2013

Sprucing Up Our Exterior--Removing Trees

Remember my post from a while ago about our new windows and how ugly our house looks in this transition phase? Well, we're making headway! Hurrah!

A reminder of the house "before"
A few weekends ago Mom and Dad came to visit with the chainsaw. I had grand aspirations of removing all the overgrown junipers and thorny bushes that were touching the house (in preparation for spring paint--so excited!).

And a view of the back. Too many bushes right up against the house.

It was only three bushes and two trees--how hard could that be?

Here's dear old Dad, starting on the juniper in front.
After one whole day of working on just the first juniper tree out front (and one Waste Management Bagster beyond full), I realized how hard it could be. And I also realized there are efficiencies in paying a tree service to do these things for you--especially when you live in city and you can't just have a good old fashioned bonfire out back.

All in a day's work. But we were all exhausted and the bag was overfull. You'll be able to see our leftover pile in a bit.

So I got an estimate today from my favorite landscape company and my hypothesis was correct. It was actually MORE economical for me to pay them, plus they can grind the stumps down, which is something we weren't able to do without the cost of more rental equipment. (I also feel better about them chipping the debris and reusing it rather that me hauling it away)


They'll be taking out the three circled trees/bushes. The forsythia on the left is beautiful in the spring and gets to stay. It's easy for us to keep in shape--so it doesn't bother me.

A closer look at the overgrown mess near our family room. It blocks so much light!
 

Different angle showing the bush and tree. You can see that the tree has grown too tall and it's now touching the gutter.
Once those are gone, I plan to use some of Mom's day lilies here. This area gets the morning sun so they should do great. And they won't grow tall enough to block precious northeast light.

The bush/tree by the dining room. (Side note: look at our old AC unit. I have plans to disguise that a little bit...someday) I also asked the tree company if they could raise the skirt on that large spruce so the area won't feel so cramped. We'll save that project for another time though.


The nasty thorny bush on the side of the house will also be gone. (And the pile of juniper we cut down that wouldn't fit in the Bagster will be chipped at no extra cost)

Whew. That's a lot of work! And that doesn't even begin to address the front lawn. BUT these items were the priority so we can get this house painted as soon as possible.

Are you working on spring projects? Anyone want to come help me design the front landscaping?

~Karli